Sunday, July 02, 2006
First try.....shotmaking
I'm short on time right now, but I'll be back later to edit this post and fill in more details.
tick tock, tick tock
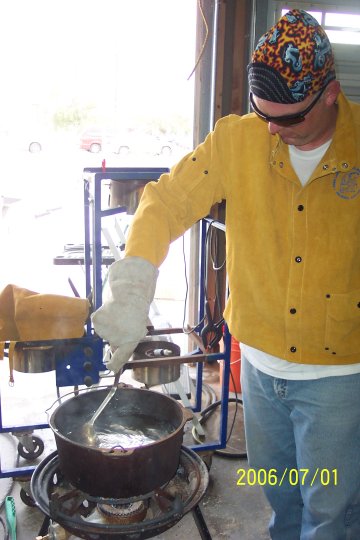
Ok.....as with any bullet casting, the first step is to clean the lead. Actually, I take that back.....the first step is to sort the good lead from the junk. We're using wheelweights collected from local tire shops as our lead source. The used weights come to us in 5 gallon buckets, mixed with old lugnuts, used rubber valve stems, broken sockets, and a myriad of other metallic junk, including stick on wheel weights that contain selenium and cannot be used for casting.
After sorting the good wheelweights from the junk, the weights go into the melting pot.

Our melting pot is an old cast iron dutch oven mounted on a steel tripod with a large single propane burner underneath. This arrangement is rock solid even with over 100 pounds of lead in the dutch oven. It takes about half an hour to melt that much lead, but large batches will help keep our final product more consistent.
A couple of quick notes about safety: in the picture above, there is a bare hand adding lead to the pot. Before you start sending nasty grams, please also note that the stuff in the pot isn't liquid yet. As soon as the lead actually started to melt, we put on our safety gear: welding gauntlets, leather welding jackets, eye protection, and hats to prevent sweat from dripping into the pot. Some folks will also notice that the melting pot appears to be inside a building. It is. What doesn't show in the picture is the 5000 cfm evaporative cooler that is blowing behind us and sending all the fumes out the open door. We may look stupid, but we try real hard not to act that way.
This is the way we were dressed for the rest of the day:
The tripod is set so that the work is done just below waist level. Using long handled utensils (think barbeque tools), the operator doesn't have to stoop over and has a perfect view of the metal without having to ever place his face over the pot. The blue rack in the background of the picture above is similar to the one we're building for the shotmaker. This one happens to be for home brewing beer........30 gallons at a time. Another hobby for another time.
We cleaned and drossed the lead using the beeswax method. I've heard of using sawdust, but I've never tried it.

final dross
The shotmaker has a much smaller melting pan than our dutch oven, so we needed an intermediate step for the lead. This was accomplished by casting 2 pound lead muffins in old cupcake pans. A single batch of wheelweights in the dutch oven yeilded 60 of the 2 pound muffins. I didn't think to get a picture of the muffins, but hopefully your imagination is good enough for you to visualize what a lead cupcake would look like.
Here's a picture of our trial setup:

The shotmaker is on a table, the ammo can is full of Sierra antifreeze, and the bus tub is there to catch the overflow from the ammo can as the shot displaces the liquid. The ingots in the pan are some left over lead cast in a Lyman ingot mold. The operational theory of this setup is:
- the shotmaker is turned on
- the lead melts in the pan
- one operator carefully lifts the shotmaker up while a second operator removes the boards underneath
- the shotmaker is placed level on the table
- the molten lead flows down the sloped melting pan, out the drippers, rolls down the small ramp (hard to see in the picture), and is quenched in the antifreeze
That's how it's supposed to work.
Our first problem was encountered when we switched the unit on. Nothing happened. After verifying that we did indeed have power to the unit, a voltmeter was fetched and we took our new toy apart. A few minutes of poking around revealed a bad fuse holder - power went in but didn't come out. Greg reached into his grab bag for the necessary parts and had the unit rewired and powered up in less than 5 minutes. Not a big deal, but it is rather disappointing to have a $300 piece of equipment sidelined by a 50 cent fuse holder.
Our second and third issues showed up when we started actually producing shot: 3 of the drippers were leaking and one was puddling on the ramp. The leaking drippers were fixed by tightening them with the unit hot (they were installed cold). We were called to dinner before we could find a solution for the puddling dripper, so that is first on our agenda for our next session. The puddling dripper is what produced the large blobs in the picture below. 
Even with the blobs from the wayward dripper, the first batch came out pretty well. The shot averages .095" (# 7 1/2) which is slightly larger than the .090" (# 8) that we wanted, but that is probably due to excess head pressure at the drippers since we had the pan full. As I recall, the melted lead is supposed to just touch the top of the drippers.....we were way past that. Our final production rack design includes a sorting station that consists of stacked seives to separate the shot into 4 groups:
- larger than # 7 1/2 -- remelt and recast
- # 7 1/2 -- my handicap loads
- #8 -- all other loads
- smaller than #8 -- remelt and recast
That's the true joy of casting your own projectiles....all your screwups can go back into the pot to be used again.
I haven't loaded any of the shot yet, but as soon as I do I'll post the pattern results.
_

are the larger pieces an error or are you going to have to screen this stuff to get the right sized shot all in the same pile???
Kirk
 : 5:59 PM
 You lot might have a secret, but it makes no sense to me.
Best regards,
Benjamin
I am Colombian and I want to know if they can help me.
Do I want to manufacture my own LITTLETON SHOTMAKER but not you if the dosificadores (drippers) has some special configuration??
thank you!!!!!
<< Home
![]()