Monday, July 17, 2006
Almost in production
A pictorial essay of yesterday's activities. Full explanations and lots of detail to be added tomorrow evening. Y'all come back now!
Ok....time to edit this post and fill in the gaps. As I mentioned earlier here and here, my partners and I have acquired a Littleton shot maker. Last Sunday Greg and I fired up the machine for the second time to move the project farther ahead. It turns out to be a good thing that we are making small production runs with a trial setup rather than proceeding directly to the full production line, because each time we run the machine we are identifying and solving more issues related to shot making. Eventually we'll have all the bugs worked out and can move on to a permanent installation.
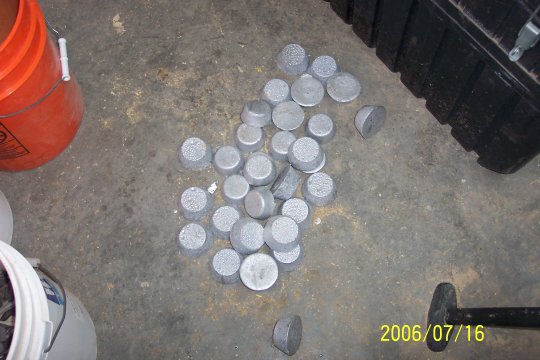
Last time I mentioned the lead muffins that we are using in the process but I didn't have a picture. For those of you who have a limited imagination, this is what they look like:

lead muffins
Even though I've been calling it the second run, this is actually our third attempt at producing shot. What I didn't detail in my last post was a failed attempt in cooling the antifreeze solution by adding water to it. The resulting 75/25 mix of antifreeze and water did not work well. The shot produced in this solution was.......well, I guess "broken" would be the best way to describe it. It looked like the pellets had shattered when they hit the coolant. It could be that the outer skin was flash cooling fast enough that the molten core caused the pellets to explode in the water, but I'm not enough of a metallurgist to know. All I know is that it didn't work worth a darn. That entire batch went back into the pot to be remelted and recast.
This time around we went back to a 100% antifreeze coolant solution and our "broken" shot problem disappeared. We also refinished the drop plate per the instructions. The first time around we didn't have any 600 grit sandpaper on hand and we attempted to make it work with only a 150 grit finish on the drop plate. For this session we started by sanding the plate with 180 grit paper, followed by 400 grit paper, then 600 grit paper. The difference in the final finish was quite noticeable and did in fact solve our puddling problems.
Note to self: follow the instructions first....it saves time.
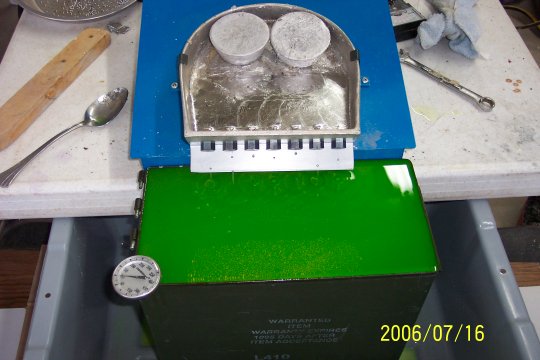
Here's what the machine looks like when it's actually dropping shot. The little drops on the plate just above the antifreeze are blobs of lead rolling down the plate on their way to becoming shot.

production run
Two issues were identified during this run: First, one of our hot-torqued drippers began leaking again, and second, the heating element is not able to keep up with the demand for molten lead. Since the offending dripper has leaked during both production runs, I'm thinking that it probably needs to be removed, thoroughly cleaned and re-installed after refinishing the mounting surface on both sides. The dripper still works, it just drops a blob every few seconds in addition to the shot. This is what is producing the oversize chunks that appear in the next few pictures.
The melting rate of the unit is going to be a little more difficult to fix. We're running all of the molten lead through the drippers before the "fresh" lead at the top of the pan melts and replenishes the working puddle. We've experimented with placing the muffins in different spots around the pan hoping to find a "hot spot" but that didn't help. We still end up lifting the machine to halt production and waiting for the muffins to melt. This isn't by choice....the lead level actually gets low enough that the machine stops dripping. We may end up having to keep the dutch oven muffin casting process running during our shot making sessions just so that we can add a dipper of molten lead to the machine every once in a while. I'm sending a copy of these posts to Mike Burgess (the owner of the company), so perhaps he can offer some advice in this direction.
After about half an hour of production time (not including melting time), the temperature of our coolant had risen to 150 degrees and the coolant itself was beginning to steam. We shut everything down at this point and went inside for some grilled tri-tip beef that had been marinating for several days, fresh green beans and pine nuts flambe'ed in bourbon, linguini with alfredo sauce, and a wonderful Australian cabernet........followed by irish coffee for desert. By the time we finished the lead had hardened and both lead and antifreeze were at a "bare hands" safe temperature.

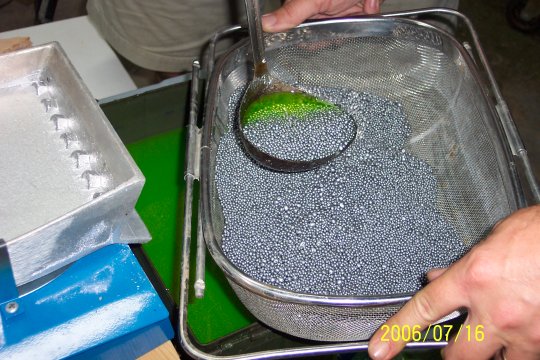
scooping out the ammo bucket after 30 minutes of production
We scooped the shot out of the ammo bucket and into a sieve using a ladle, washed it with Simple Green and rinsed it for several minutes in fresh water. Greg has two industrial stainless steel sinks in his garage as part of the beer making operation, so cleaning and rinsing the shot was quite simple. The sieve shown above has adjustable handles that expand to fit over the sides of the sink, leaving the sieve itself hanging in the middle. It's just a simple matter of grabbing the overhead water hose and spraying while stirring the shot.
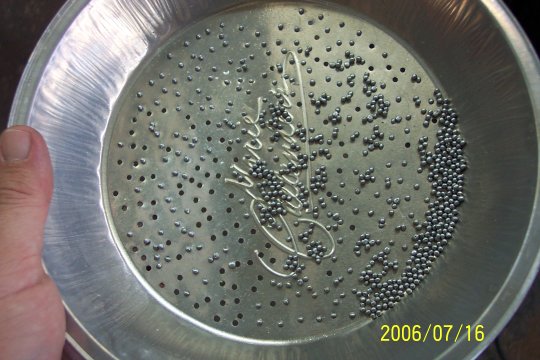
In our final design we're planning on having several stacked, vibrating screens to sort the shot by size. For experimentation purposes, we drilled holes in two pie pans. The first pan was drilled with a 7/64" drill bit (.109") and was used to separate the big blobs from the leaking dripper and any shot bigger than a #7. Shaking the shot through this pan went very quickly and did a fine job of removing the unusable chunks from the mix. Once the leaking dripper is fixed I expect the amount of shot caught in this pan to drop to almost nil.

caught by the .109" sorting pan
The second pan was drilled with a 3/32" (.094") bit. Number 8 shot is supposed to be .090" and number 7 1/2 should be .095", so within the margin of error produced by hand drilling the holes this step should keep all of our usable shot "legal" for target shooting purposes. All of the sanctioning bodies for American clay target sports require #7 1/2 or smaller shot. The final sorting area will eventually be set up to sort the shot into 4 groups: bigger than 7 1/2, 7 1/2, 8, and smaller than 8. The 'smaller than 8' group was left in the mix this time....mostly because we didn't feel like drilling any more damn holes.

caught by the .094" sorting pan
Sifting the shot through this pan took quite a bit longer than the first pan because the holes kept getting plugged with shot. The shot retained by this pan would be fine for hunting, but we tossed it back into the melter.
The finish-sorted shot looked like this:

ready to shoot
I should point out that these pictures were taken of different batches at different times during the sort, so the ratio of rejects to good pieces that appears in the pictures is not accurate. We ended up with about 30 pounds of usable shot and a partial pie pan of rejects.
The shot that we are producing now averages out to be around #7 3/4........between # 7 1/2 and # 8. We haven't quite gotten the "round" thing down yet and are producing somewhat egg shaped shot with little dimples in them. I understand that the dimple is a normal thing and will not change the performance. The effectiveness of the egg shaped shot remains to be seen. I shot my first 100 straight using shot from a Littleton shot maker from a 23 yard handicap in 1987, and backed it up with a 97 from 24 1/2 yards later that same day. I'm not too worried about the performance, but Greg remains uncertain about it. Patterning and broken clays will tell the true story.
This evening I loaded two boxes of the new shot just to see how it works. This batch was left without graphite on purpose just to see what affect the graphite has on overall performance. I'll coat some of the shot with graphite tomorrow evening and load some comparison shells. The uncoated shot worked just fine through my Mec Sizemaster with no problems dropping and no evidence of clumping. Three shot drops were weighed and counted, producing the following results:
Ok....time to edit this post and fill in the gaps. As I mentioned earlier here and here, my partners and I have acquired a Littleton shot maker. Last Sunday Greg and I fired up the machine for the second time to move the project farther ahead. It turns out to be a good thing that we are making small production runs with a trial setup rather than proceeding directly to the full production line, because each time we run the machine we are identifying and solving more issues related to shot making. Eventually we'll have all the bugs worked out and can move on to a permanent installation.
Last time I mentioned the lead muffins that we are using in the process but I didn't have a picture. For those of you who have a limited imagination, this is what they look like:
lead muffins
Even though I've been calling it the second run, this is actually our third attempt at producing shot. What I didn't detail in my last post was a failed attempt in cooling the antifreeze solution by adding water to it. The resulting 75/25 mix of antifreeze and water did not work well. The shot produced in this solution was.......well, I guess "broken" would be the best way to describe it. It looked like the pellets had shattered when they hit the coolant. It could be that the outer skin was flash cooling fast enough that the molten core caused the pellets to explode in the water, but I'm not enough of a metallurgist to know. All I know is that it didn't work worth a darn. That entire batch went back into the pot to be remelted and recast.
This time around we went back to a 100% antifreeze coolant solution and our "broken" shot problem disappeared. We also refinished the drop plate per the instructions. The first time around we didn't have any 600 grit sandpaper on hand and we attempted to make it work with only a 150 grit finish on the drop plate. For this session we started by sanding the plate with 180 grit paper, followed by 400 grit paper, then 600 grit paper. The difference in the final finish was quite noticeable and did in fact solve our puddling problems.
Note to self: follow the instructions first....it saves time.
Here's what the machine looks like when it's actually dropping shot. The little drops on the plate just above the antifreeze are blobs of lead rolling down the plate on their way to becoming shot.
production run
Two issues were identified during this run: First, one of our hot-torqued drippers began leaking again, and second, the heating element is not able to keep up with the demand for molten lead. Since the offending dripper has leaked during both production runs, I'm thinking that it probably needs to be removed, thoroughly cleaned and re-installed after refinishing the mounting surface on both sides. The dripper still works, it just drops a blob every few seconds in addition to the shot. This is what is producing the oversize chunks that appear in the next few pictures.
The melting rate of the unit is going to be a little more difficult to fix. We're running all of the molten lead through the drippers before the "fresh" lead at the top of the pan melts and replenishes the working puddle. We've experimented with placing the muffins in different spots around the pan hoping to find a "hot spot" but that didn't help. We still end up lifting the machine to halt production and waiting for the muffins to melt. This isn't by choice....the lead level actually gets low enough that the machine stops dripping. We may end up having to keep the dutch oven muffin casting process running during our shot making sessions just so that we can add a dipper of molten lead to the machine every once in a while. I'm sending a copy of these posts to Mike Burgess (the owner of the company), so perhaps he can offer some advice in this direction.
After about half an hour of production time (not including melting time), the temperature of our coolant had risen to 150 degrees and the coolant itself was beginning to steam. We shut everything down at this point and went inside for some grilled tri-tip beef that had been marinating for several days, fresh green beans and pine nuts flambe'ed in bourbon, linguini with alfredo sauce, and a wonderful Australian cabernet........followed by irish coffee for desert. By the time we finished the lead had hardened and both lead and antifreeze were at a "bare hands" safe temperature.
scooping out the ammo bucket after 30 minutes of production
We scooped the shot out of the ammo bucket and into a sieve using a ladle, washed it with Simple Green and rinsed it for several minutes in fresh water. Greg has two industrial stainless steel sinks in his garage as part of the beer making operation, so cleaning and rinsing the shot was quite simple. The sieve shown above has adjustable handles that expand to fit over the sides of the sink, leaving the sieve itself hanging in the middle. It's just a simple matter of grabbing the overhead water hose and spraying while stirring the shot.
In our final design we're planning on having several stacked, vibrating screens to sort the shot by size. For experimentation purposes, we drilled holes in two pie pans. The first pan was drilled with a 7/64" drill bit (.109") and was used to separate the big blobs from the leaking dripper and any shot bigger than a #7. Shaking the shot through this pan went very quickly and did a fine job of removing the unusable chunks from the mix. Once the leaking dripper is fixed I expect the amount of shot caught in this pan to drop to almost nil.

caught by the .109" sorting pan
The second pan was drilled with a 3/32" (.094") bit. Number 8 shot is supposed to be .090" and number 7 1/2 should be .095", so within the margin of error produced by hand drilling the holes this step should keep all of our usable shot "legal" for target shooting purposes. All of the sanctioning bodies for American clay target sports require #7 1/2 or smaller shot. The final sorting area will eventually be set up to sort the shot into 4 groups: bigger than 7 1/2, 7 1/2, 8, and smaller than 8. The 'smaller than 8' group was left in the mix this time....mostly because we didn't feel like drilling any more damn holes.
caught by the .094" sorting pan
Sifting the shot through this pan took quite a bit longer than the first pan because the holes kept getting plugged with shot. The shot retained by this pan would be fine for hunting, but we tossed it back into the melter.
The finish-sorted shot looked like this:

ready to shoot
I should point out that these pictures were taken of different batches at different times during the sort, so the ratio of rejects to good pieces that appears in the pictures is not accurate. We ended up with about 30 pounds of usable shot and a partial pie pan of rejects.
The shot that we are producing now averages out to be around #7 3/4........between # 7 1/2 and # 8. We haven't quite gotten the "round" thing down yet and are producing somewhat egg shaped shot with little dimples in them. I understand that the dimple is a normal thing and will not change the performance. The effectiveness of the egg shaped shot remains to be seen. I shot my first 100 straight using shot from a Littleton shot maker from a 23 yard handicap in 1987, and backed it up with a 97 from 24 1/2 yards later that same day. I'm not too worried about the performance, but Greg remains uncertain about it. Patterning and broken clays will tell the true story.
This evening I loaded two boxes of the new shot just to see how it works. This batch was left without graphite on purpose just to see what affect the graphite has on overall performance. I'll coat some of the shot with graphite tomorrow evening and load some comparison shells. The uncoated shot worked just fine through my Mec Sizemaster with no problems dropping and no evidence of clumping. Three shot drops were weighed and counted, producing the following results:
- shell 1 - 420.4 grains - 373 pieces
- shell 2 - 423.1 grains - 376 pieces
- shell 3 - 416.0 grains - 370 pieces
The shot bar used for this test was optimized to drop 435 grains (just a hair under 1 ounce) of #8 shot. Our shot is dropping a little light in overall weight, and the pellet count corresponds with the #7 3/4 size estimation. Number 8 should have 409 pellets per ounce and number 7 1/2 should have 345 pellets per ounce. The 6 pellet max variation between the three shells doesn't bother me at all for practice ammo, and I expect this variation to decrease as our production methods begin producing more consistently sized shot.
Patterning will commence on Sunday. Stay tuned!
_
Comments:
<< Home
Nice...
Do you get R&D creds for all the work you are doing to try and make the shot machine work better???
You may want to add a radiator setup for your coolant. just a coil of hose through a bucket of ice should do the trick... (a fish-tank pump may work to circulate the coolant).
Do you get R&D creds for all the work you are doing to try and make the shot machine work better???
You may want to add a radiator setup for your coolant. just a coil of hose through a bucket of ice should do the trick... (a fish-tank pump may work to circulate the coolant).
# posted by  : 12:12 PM
: 12:12 PM
Our plan to address the cooling issue is to circulate the coolant through an automotive heater core with a fan blowing through it....although a coil of copper pipe in a bucket of ice would work too.
Sadly no R&D credit. It seems that everyone who buys one of these has to go through the same tribulations. We're actually proceeding pretty fast thanks to the help of several other Littleton owners who have posted on the web about their machines.
Len
Sadly no R&D credit. It seems that everyone who buys one of these has to go through the same tribulations. We're actually proceeding pretty fast thanks to the help of several other Littleton owners who have posted on the web about their machines.
Len

Hi,
I have been making shot in the UK with my own home made shot makers for several years now. I get the best results by dropping the shot into very light oil.
I notice how you are trying to keep the coolant cool. The commercial process is called "the short drop" or Bliemeister process. I have found very little information on this on the web but the two descriptions I have found suggest the coolant (or water) is heated – see below.
My shot is not perfectly round (but if you look at commercial shot that is also not perfectly round) but it shoots ok at my local Clay Club and I have never had any vermin complaining.
Good luck with your shot making.
Regards
John
J.Bridges@btopenworld.com
England (UK).
· A more modern method, called the Bliemeister method, does away with the expensive-to-build shot tower. In this method, droplets of molten lead actually fall only about an inch into a tank of hot water, roll across an incline plane and then continue falling through hot water for another 3 feet or so. Water temperature is used to control the rate of cooling, and surface tension brings the lead droplets into a spherical form.
· The Bliemeister method is to run the shot down a semi-circular grooved heated plate which is gradually cooled using heated water. I have also seen a patent that uses heated boro-silicate glass tubing that is spiral looped thru a heat exchanging fluid. As the shot rolls down and around the tube it forms a sphere.
# posted by : 1:45 PM
: 1:45 PM
Is there any other coolant besides antifreeze that will work? I'll have problems with antifreeze; the wife likes to let the dog out and I don't need a poisoned pup. Reading your post tells me that waterquenched wheelweights won't work. I'd have trouble washing the shot after the antifreeze.
# posted by : 6:27 PM
: 6:27 PM
Hi there all
My names Lemmy, from South Africa. Have been making shot successfully for a few years. We use cutting fluid, (which is very expensive) or alternatively diesel. Only problem is that its a bit messy and needs to be cleaned off with prepsol (engine cleaner) then let it dry and then add graphite powder and store it in tins ready for use.
My names Lemmy, from South Africa. Have been making shot successfully for a few years. We use cutting fluid, (which is very expensive) or alternatively diesel. Only problem is that its a bit messy and needs to be cleaned off with prepsol (engine cleaner) then let it dry and then add graphite powder and store it in tins ready for use.
# posted by : 5:35 AM
: 5:35 AM
I've had my shotmaker for about 4 years now, and have created and sold more than 15 tons of shot. DOT-3 brake fluid seems to work just fine for me as it is the best comprimise between performance and cost. I can run 40lbs/run into a single .50 ammo can without cooling, it washes off very easily with warm water (little to no residue), and the shot is very smooth, round, and mostly dimple free. As a matter of fact, after 30,000lbs of shot, I'm still using what's left of the original 10 gallons.
As for not being able to keep the melting rate up in the ladle, place ALL of the current run's extra ingots on top of the shot maker as close as possible to the ladle (without touching it). This preheats them, and they melt much faster once placed into the ladle. I start out a run with four ingots in the ladle, and 36 stacked up and surrounding it. Always keep at least 2 in the pot, but watch the molten level. Too, high and it will puddle out of the dripers no matter what you do. Keep a small butane soldering torch handy to quickly heat any drippers that occasionally freeze when a new ingot is introduced into the pot. A little direct flame on the dripper, then a light tap with a wooden rod on the ladle always gets them going again quickly.
After a batch is done, I pull a small plug (tooth pick actually) out of a drilled hole near the bottom of the ammo can to let the brake fluid drain. I come back about an hour later to cool-enough-to-touch, drained shot which I then pour into a metal coffee can that has many very small holes drilled in the bottom for rinsing. If hot water is used, all forty pounds can be rinsed in the can with less than one gallon of water.
I used to dry the rinsed shot outside on elevated window screen, but Minnesota's very humid summers and below freezing winters did not lend themselves to an efficient operation, so now I dry indoors. Old bath towels work great. 80lbs will dry on one towel in about 2 days with the help of a small fan. Be careful where you put the shot to dry though. Cats will use it as litter (ask me how I know).
When the shot is dry, I tumble about 20lbs at a time in a Fraklin Aresonal vibration tumbler with 1 teaspoon of graphite powder for 4-6 hours, over night if possible. This further polishes and rounds the shot. In pattern testing, my graphite tumbled shot averaged about 10% better than no graphite. A tech a BALLISTIC PRODUCTS INC told me this was do to the graphite preventing the shot from fusing during setback.
For sorting shot sizes, I created a rotory seperator. Several containers of progressively larger size, with smaller and smaller holes in each one. (Think of those Russian china dolls that all fit inside each other) In fifteen minutes, it will seperate 20lbs of larger than 6shot (junk), 6 shot, 7.5 shot, 8 shot, 8.5 shot, 9 shot, 10 shot, and finally, the small "junk" Yeh, I had to drill A LOT OF DANGED HOLES. The clogged hole problem is solved as the container rotates, the clogged pellets simple fall back out of the holes.
Overall, I package my shot as "Semi-Mag Shot", as it tends to pattern slightly more open than "factory" Magnum shot, but considerably tighter than "Chilled" shot.
Sorry about the length of this comment. I hope my experience can help with some of the above issues. I'm always happy to help anyone save some money to shoot more and expand our sport. Please contact me with any questions.
wopper_lund@hotmail.com
PS I've started making Bismuth shot now, but am still working out bugs. I got my first good 5 lb batch of #4shot yesterday. I can't wait to see how it patterns.
# posted by : 9:49 PM
: 9:49 PM
I have been running a shotmaker for about three months and have had good luck with a 50% mix of water and raw machining coolant. The coolant can be purchased for a manufacturing suply catologe, but it would probably be cheaper to get from a local machine shop as they buy it in bulk. If the coolant is to rich you get dimmpled shot, to thin and you get tear drop shaped shot. I tend to run a little on the thick side for coolant.
Post a Comment
# posted by : 7:35 AM
: 7:35 AM << Home
![]()