Monday, July 24, 2006
Speedy service
Guess what I got today:
Eleven days ago, I mentioned here that I had just sent Nathan's Citori off to Carlson's Choke Tubes to have a set of interchangeable chokes added. The completed barrels and choke tubes were waiting for me when I got home from work today. Shipped on the 13th, received on the 19th, and back in my hands on the 24th. Fantastic turnaround. The package contained my bubble wrapped barrels with two tubes installed, four other tubes in their packages, the empty packages for the tubes in the barrels, two keychain universal wrenches, a universal speed wrench, a detailed receipt, and a stack of catalogs to be passed out to the students in my SCTP group.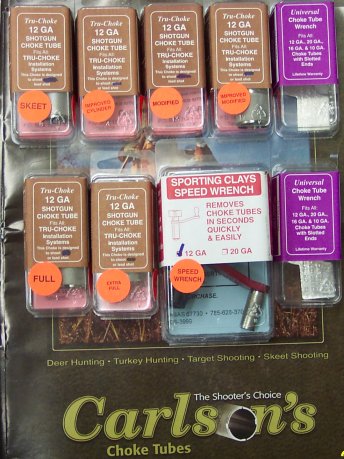
After fondling the tubes for a while (the choke tubes for those of you with dirty minds), I broke out my calipers to see what I could learn about them. I had requested standard thickness tubes but had also given previous authorization to install thinwall tubes if they were required. I received thinwall tubes. It appears that the main reason for the thinwall tubes in this case probably wasn't the thickness of the barrels themselves but the separation between the barrels. The machined barrels still have plenty of material in the barrel wall, but the installed extended length tubes are close to each other. Really close. One piece of paper (.0045") will fit between them but two pieces of paper (.009") will not fit. Most importantly they seem to be parallel within my ability to measure. That's somewhat important. {big grin}
The tubes themselves are slightly longer than the Remington "Remchoke" tubes that I have for the SCTP 1100's. Where the Remington tubes are only marked with the common designation (imp cyl, mod, full) and only marked on the side of the tube, the Carlson chokes are marked with the actual restriction on the side and an abbreviated common designation on the visible portion of the tube. I like that......no more sticking a dime in the barrel to see what choke is installed.
The inside diameters of the tubes measured as follows:
- Skeet marked .725 measured .723
- Improved Cylinder marked .720 measured .719
- Modified marked .710 measured .709
- Improved Modified marked .705 measured .702
- Full marked .700 measured .697
- Extra Full marked .690 measured .689
The tubes appear to be well machined, with a beveled edge at the barrel/tube interface to prevent the wad from hanging up on the tube itself as it goes by. The notches in the forward end of the tubes (for the tube wrench) are rather sharp, but we're very careful and safety conscious when dealing with the muzzle of our guns anyway, aren't we? The machining in the barrels appears to be clean and sharp, with nicely cut threads and no burrs or chatter marks. So far everything indicates quality work done by competent professionals.
The only disappointment in the whole deal is the keychain style universal wrenches that were included with the package. These are the common "T" style wrench, but with a twist: instead of a square projection to stick into the tube these have a rounded projection. When combined with the thinwall tubes there just doesn't seem to be enough bearing surface to obtain a positive engagement. The first time I tried to use one of these it slipped, rounding off one of the notches on the improved modified tube and taking a chunk out of my knuckle. Both of the universal wrenches went in the bottom of the tool box for emergency use only.
universal wrench
The other wrench included with the package was much nicer. This was a universal speed wrench with a very different design. The wrench consists of a handle with a free-spinning knob, a thumbscrew, and a rubber covered threaded rod. When the thumbscrew is tightened the overall length of the threaded rod is reduced, making the rubber covering expand to fill the inside of the choke tube. One simply sticks the rubber rod into the tube, tightens the thumbscrew, and turns the handle. MUCH nicer than the other wrenches. My only concern with this design is the posibility that grit on the rubber may scratch the inside of the choke tube. This isn't a show stopper....anyone who can clean their shooting glasses should be able to keep the rubber on their choke tube wrench clean.
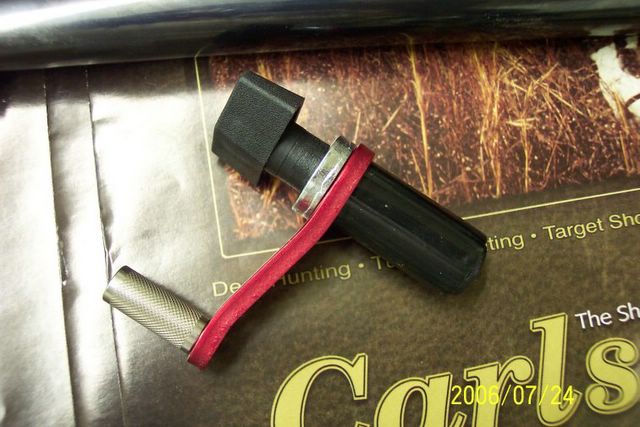
speed wrench
Overall I am very pleased with the service provided by Carlson's. They do quality work and the delivery time is simply amazing. What makes it even better is that the cost of the entire project (machining, 6 tubes, wrenches, and return shipping) was only $285.
Look for patterning results to be included with the continuing coverage of the Littleton shot maker saga.
_
Sunday, July 23, 2006
Final shot prep and initial testing
Before we cover the patterning, I want to step back a bit to the final finishing step in the shotmaking process. The shells I loaded last time were done with untreated shot. The bare metal oxidized to a pretty greyish blue color as it dried and had a somewhat grainy texture. My original intention was to split my first loaded batch into groups of finished and unfinished so that I could pattern the shot both ways and try to quantify the effects of surface finish on the pattern. It wasn't until I had half of my original supply loaded that I realized it needed to be split into thirds, not halves.......I had missed an important step in the finishing process that needed to be tested.
I was sitting in the garage, staring at the bucket of shot, lubricating my synapses with a bottle of RedHook ESB and a pastrami sandwich, trying to decide what the best way would be to apply a thin coating of graphite to the unfinished shot. We're eventually going to use a cement mixer to do large batches, but at the moment I didn't have a cement mixer handy. The most common method of small scale graphite application that I have seen mentioned on the web is to simply put the shot into a bucket, add a few poofs of graphite, and swirl the mix around until the shot is coated. That was way to simple for me.....there had to be a more complicated, time consuming, cumbersome, and expensive method available. My gaze wandered over the assorted equipment in my loading area and settled on my brass tumbler. Aha! A way to spend lots of time coating the shot and make a boatload of noise at the same time!
That was when I realized that there was an intermediate finishing step that I needed to test. By running the shot in the vibratory tumbler I would not only be coating it with graphite, I would be peening the shot as well........much like the old rock polishers that we had as kids. What would be the result of simply peening the shot in the tumbler without any graphite? Would it soften the edges and drip marks? What would happen to the coating of oxidation? Inquiring minds want to know..........
I divided my remaining shot into two groups and placed one batch into the tumbler without any additives. One hour later I had this:

The unfinished shot is on the left. The peening process actually did a fine job of polishing the shot. In fact, it did such a good job that I was tempted to skip the graphite process altogether. The oxidation had disappeared and was replaced with a black, shiny finish that looked exactly like factory produced shot. The next batch of shot was tumbled for an hour with two poofs of graphite. The shot from that batch had the same smooth, hard finish but wasn't nearly as shiny and left behind a slight graphite residue when handled. Both types flowed and rolled quite a bit more smoothly than the untreated shot. At this point I'm upset that I loaded as much of the unfinished shot as I did.
In my last post I mentioned that the pellet count and total weight thrown by my one ounce charge bar was lower with our homecast #7 3/4 shot than with factory #8. The same held true for 1 1/8 ounce loads. The average pellet count was 420, and the average weight was 470 grains - roughly 1 1/16 ounce. If we do go into mass production with this setup I will customize a bar just for this shot so that we get a full 1 1/8 ounce charge. For now, this is close enough.
Today at the range I fired 3 test patterns, two through my BT-99 and one with the modified barrel of Kathy's Citori. Nathan's gun is still at Carlson's, so it will have to wait until next time. My first shot with the BT was pulled to the right, so that pattern was set aside. It looked good, but was obviously off center and part of the pattern was missing off the side of the paper. The second shot was well centered, as was the shot with Kathy's Citori. Before everybody starts griping let me say that I know that one pattern does not constitute a thorough test. It's what I had time for and it at least will let me know if I should proceed or not.
Here is the pattern data for Kathy's gun, with the pattern results from Winchester factory loaded AA target shells as a comparison:
12 gauge Browning Citori, 28 inch "modified" choke, actual restriction .025
Winchester AA light target 2 3/4 dram, 1 1/8 ounce, #8 shot
total pellets: 460
total pellets impacting in a 30" circle at 40 yards: 303
pattern percentage: 66%
Reload, Winchester AA hull, Winchester 209 primer, 17.5 gr 700X, Winchester WAA12 wad
1 1/16 ounce # 7 3/4 homecast shot, peened and graphited
total pellets: 420
total pellets impacting in a 30" circle at 40 yards: 302
pattern percentage: 72%
With the BT-99 the results were even more interesting:
12 gauge Browning BT-99, 32 inch "improved modified" choke, actual restriction .030
Winchester AA light target 2 3/4 dram, 1 1/8 ounce, #8 shot
total pellets: 460
total pellets impacting in a 30" circle at 40 yards: 349
pattern percentage: 76%
Reload, Winchester AA hull, Winchester 209 primer, 17.5 gr 700X, Winchester WAA12 wad
1 1/16 ounce # 7 3/4 homecast shot, peened only
total pellets: 420 total
pellets impacting in a 30" circle at 40 yards: 376
pattern percentage: 89%
Yes, that really does say 89%. This is where that off-center pattern that I fired earlier comes back into play. I couldn't believe that I really had just produced an 89% pattern, so I went back and counted the pellet strikes in the off center pattern. Even with part of the pattern obviously off the paper it still came out with 360 pellet strikes or 86%.
I don't know why the pellet count in these patterns is so high. Perhaps the ungraphited shot is clumping in the barrel and not spreading out until farther downrange. Next weekend I'll do more testing with the graphited and un-graphited shot and try to duplicate these results. For now they are so far off the scale that I have a hard time believing that it is credible data..........except that I have the pattern paper sitting in front of me.

note - the big black dot is not a clump of pellet strikes....it's just a big black dot that was on the paper. There are 3 pellet strikes in the black dot.
Stay tuned folks, this is getting interesting!
_
Monday, July 17, 2006
Almost in production
Ok....time to edit this post and fill in the gaps. As I mentioned earlier here and here, my partners and I have acquired a Littleton shot maker. Last Sunday Greg and I fired up the machine for the second time to move the project farther ahead. It turns out to be a good thing that we are making small production runs with a trial setup rather than proceeding directly to the full production line, because each time we run the machine we are identifying and solving more issues related to shot making. Eventually we'll have all the bugs worked out and can move on to a permanent installation.
Last time I mentioned the lead muffins that we are using in the process but I didn't have a picture. For those of you who have a limited imagination, this is what they look like:
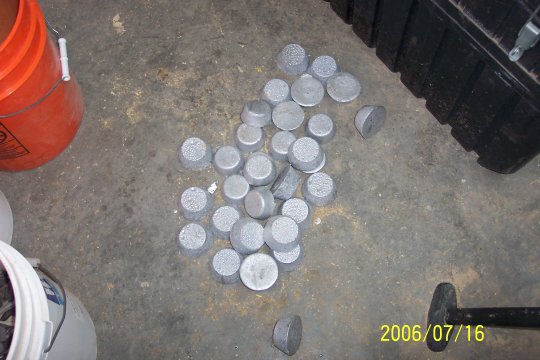
lead muffins
Even though I've been calling it the second run, this is actually our third attempt at producing shot. What I didn't detail in my last post was a failed attempt in cooling the antifreeze solution by adding water to it. The resulting 75/25 mix of antifreeze and water did not work well. The shot produced in this solution was.......well, I guess "broken" would be the best way to describe it. It looked like the pellets had shattered when they hit the coolant. It could be that the outer skin was flash cooling fast enough that the molten core caused the pellets to explode in the water, but I'm not enough of a metallurgist to know. All I know is that it didn't work worth a darn. That entire batch went back into the pot to be remelted and recast.
This time around we went back to a 100% antifreeze coolant solution and our "broken" shot problem disappeared. We also refinished the drop plate per the instructions. The first time around we didn't have any 600 grit sandpaper on hand and we attempted to make it work with only a 150 grit finish on the drop plate. For this session we started by sanding the plate with 180 grit paper, followed by 400 grit paper, then 600 grit paper. The difference in the final finish was quite noticeable and did in fact solve our puddling problems.
Note to self: follow the instructions first....it saves time.
Here's what the machine looks like when it's actually dropping shot. The little drops on the plate just above the antifreeze are blobs of lead rolling down the plate on their way to becoming shot.
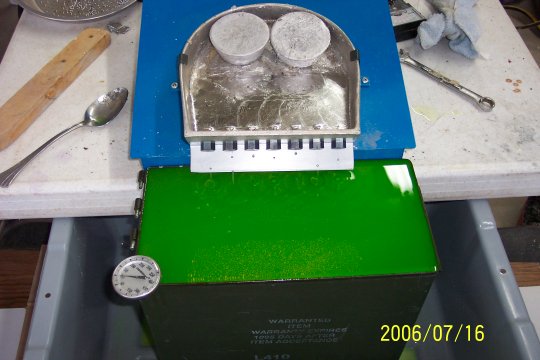
production run
Two issues were identified during this run: First, one of our hot-torqued drippers began leaking again, and second, the heating element is not able to keep up with the demand for molten lead. Since the offending dripper has leaked during both production runs, I'm thinking that it probably needs to be removed, thoroughly cleaned and re-installed after refinishing the mounting surface on both sides. The dripper still works, it just drops a blob every few seconds in addition to the shot. This is what is producing the oversize chunks that appear in the next few pictures.
The melting rate of the unit is going to be a little more difficult to fix. We're running all of the molten lead through the drippers before the "fresh" lead at the top of the pan melts and replenishes the working puddle. We've experimented with placing the muffins in different spots around the pan hoping to find a "hot spot" but that didn't help. We still end up lifting the machine to halt production and waiting for the muffins to melt. This isn't by choice....the lead level actually gets low enough that the machine stops dripping. We may end up having to keep the dutch oven muffin casting process running during our shot making sessions just so that we can add a dipper of molten lead to the machine every once in a while. I'm sending a copy of these posts to Mike Burgess (the owner of the company), so perhaps he can offer some advice in this direction.
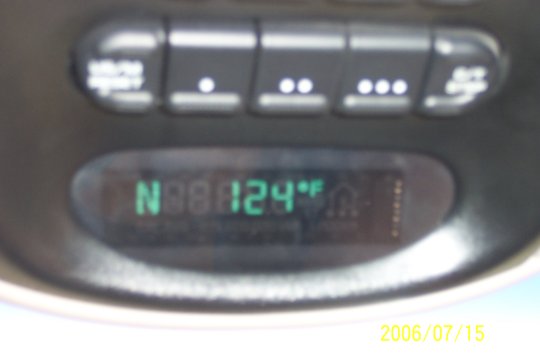
After about half an hour of production time (not including melting time), the temperature of our coolant had risen to 150 degrees and the coolant itself was beginning to steam. We shut everything down at this point and went inside for some grilled tri-tip beef that had been marinating for several days, fresh green beans and pine nuts flambe'ed in bourbon, linguini with alfredo sauce, and a wonderful Australian cabernet........followed by irish coffee for desert. By the time we finished the lead had hardened and both lead and antifreeze were at a "bare hands" safe temperature.
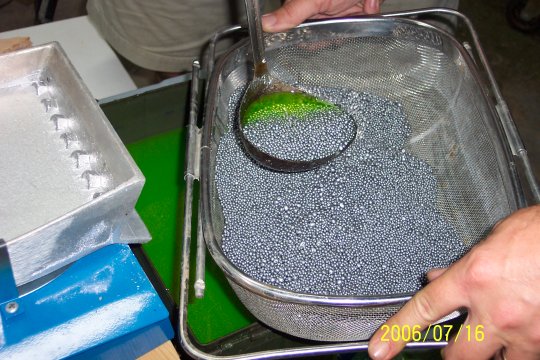
scooping out the ammo bucket after 30 minutes of production
We scooped the shot out of the ammo bucket and into a sieve using a ladle, washed it with Simple Green and rinsed it for several minutes in fresh water. Greg has two industrial stainless steel sinks in his garage as part of the beer making operation, so cleaning and rinsing the shot was quite simple. The sieve shown above has adjustable handles that expand to fit over the sides of the sink, leaving the sieve itself hanging in the middle. It's just a simple matter of grabbing the overhead water hose and spraying while stirring the shot.
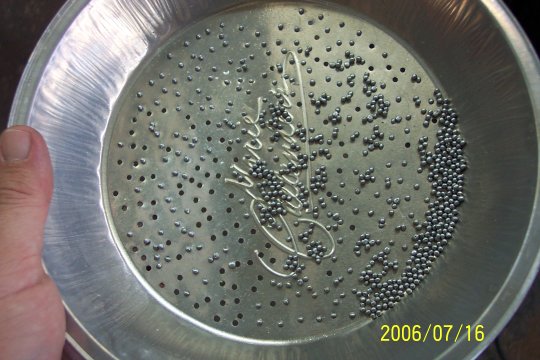
In our final design we're planning on having several stacked, vibrating screens to sort the shot by size. For experimentation purposes, we drilled holes in two pie pans. The first pan was drilled with a 7/64" drill bit (.109") and was used to separate the big blobs from the leaking dripper and any shot bigger than a #7. Shaking the shot through this pan went very quickly and did a fine job of removing the unusable chunks from the mix. Once the leaking dripper is fixed I expect the amount of shot caught in this pan to drop to almost nil.

caught by the .109" sorting pan
The second pan was drilled with a 3/32" (.094") bit. Number 8 shot is supposed to be .090" and number 7 1/2 should be .095", so within the margin of error produced by hand drilling the holes this step should keep all of our usable shot "legal" for target shooting purposes. All of the sanctioning bodies for American clay target sports require #7 1/2 or smaller shot. The final sorting area will eventually be set up to sort the shot into 4 groups: bigger than 7 1/2, 7 1/2, 8, and smaller than 8. The 'smaller than 8' group was left in the mix this time....mostly because we didn't feel like drilling any more damn holes.
caught by the .094" sorting pan
Sifting the shot through this pan took quite a bit longer than the first pan because the holes kept getting plugged with shot. The shot retained by this pan would be fine for hunting, but we tossed it back into the melter.
The finish-sorted shot looked like this:

ready to shoot
I should point out that these pictures were taken of different batches at different times during the sort, so the ratio of rejects to good pieces that appears in the pictures is not accurate. We ended up with about 30 pounds of usable shot and a partial pie pan of rejects.
The shot that we are producing now averages out to be around #7 3/4........between # 7 1/2 and # 8. We haven't quite gotten the "round" thing down yet and are producing somewhat egg shaped shot with little dimples in them. I understand that the dimple is a normal thing and will not change the performance. The effectiveness of the egg shaped shot remains to be seen. I shot my first 100 straight using shot from a Littleton shot maker from a 23 yard handicap in 1987, and backed it up with a 97 from 24 1/2 yards later that same day. I'm not too worried about the performance, but Greg remains uncertain about it. Patterning and broken clays will tell the true story.
This evening I loaded two boxes of the new shot just to see how it works. This batch was left without graphite on purpose just to see what affect the graphite has on overall performance. I'll coat some of the shot with graphite tomorrow evening and load some comparison shells. The uncoated shot worked just fine through my Mec Sizemaster with no problems dropping and no evidence of clumping. Three shot drops were weighed and counted, producing the following results:
- shell 1 - 420.4 grains - 373 pieces
- shell 2 - 423.1 grains - 376 pieces
- shell 3 - 416.0 grains - 370 pieces
The shot bar used for this test was optimized to drop 435 grains (just a hair under 1 ounce) of #8 shot. Our shot is dropping a little light in overall weight, and the pellet count corresponds with the #7 3/4 size estimation. Number 8 should have 409 pellets per ounce and number 7 1/2 should have 345 pellets per ounce. The 6 pellet max variation between the three shells doesn't bother me at all for practice ammo, and I expect this variation to decrease as our production methods begin producing more consistently sized shot.
Patterning will commence on Sunday. Stay tuned!
_
Owha tafoo liam
Hence the title of this post. Just say it quickly and you'll figure it out.
The excuse this year is that the alternator in her van gave out. According to her, by the time she buys the alternator and has it installed, she just won't have enough money to bring the kids home. She called this evening to tell me that I had to buy the plane tickets. Again.
To be really truthful, this isn't much of a surprise. After being burned so many times in the past I would have been surprised if it had turned out the other way and she actually had managed to bring the kids home without any drama. At least this year she had the courtesy to give me enough advance notice that I could get the cheap plane tickets instead of the "oh crap, gotta travel tomorrow" tickets.
One thing makes it all worthwhile: the way Kathy and Nathan reacted when she told them. She told me about it when I called to inform her of their itinerary. Apparently, earlier today, before she called me, she told the kids that because of the alternator replacement she was going to have to cancel their trip to Six Flags, that she wouldn't be able to bring them home, that she wouldn't be able to get married in Oak Creek Canyon like she had planned, and that she was going to have to call me to ask for money for plane tickets. The kids didn't cry, they didn't yell, they didn't gripe at her, they weren't even angry...........................
They both laughed in her face.
I think perhaps they understand much more about what kind of person their mother really is than she gives them credit for.
PS: Do the math on everything that was cancelled due to the alternator going bad. Someone on the other side of the country doesn't add and subtract well. My children certainly do.
_
Sunday, July 16, 2006
Thursday, July 13, 2006
Carlson's choke tubes part 1
Kathy has informed me in no uncertain terms that she thinks sporting clays is "just for fun" and that she would rather clean toilets at the bus station than shoot skeet. Trap is her game. Period. End of discussion. Therefore, the fixed chokes in her Citori (.025 and .035 restriction) are just fine for what she does.
Nathan, on the other hand, enjoys every shooting game imaginable. If it involves turning money into noise, he likes it. His Citori also has fixed chokes (.010 and .020 restriction), but for him that is too limiting. He needs more variety if he's going to shoot everything from skeet to long yardage trap handicap with the same shotgun.
That's how Carlson's choke tubes come into the picture. Carlson's has an excellent reputation and a lifetime warranty, plus their turnaround time is reputed to be lightning fast. I called this morning and had a very nice conversation with Scott. He answered all of my questions, asked a few questions of his own, and made a several recommendations, such as using their extended length sporting clays tubes instead of the standard flush tubes for target shooting. The machine work to thread Nathan's barrels for interchangeable tubes would be $175 with 3 tubes included in that price. Additional tubes would be $29.95 -- $5 lower than the advertised price on their web site. I don't know if this was a package deal or if he just felt sorry for me, but I didn't argue. In the end I ordered 6 choke tubes : Skeet 1 (.005), Improved Cylinder (.010), Modified (.020), Improved Modified (.025), Full (.030), and Extra Full (.040).
Scott says that the machine work will take about two days of shop time. I sent the barrels out today, so the machine work should be finished next week and I should have the barrels back well before the end of the month.
Stay tuned for a full report on the quality of Carlson's work and a full patterning report on the new tubes.
_
Sunday, July 09, 2006
Construction
OK....so maybe it didn't quite work out that way.
As I've mentioned before, I'm the lead coach for the Buckeye Sportsman Club youth SCTP team. One of our major challenges is the fact that we don't have an actual clay target range to practice on. We shoot at a rifle range using portable throwers, hay bales as trap houses, and shooting stations marked with spray paint on the dirt. We do have our own private section of the range, but it's just bare dirt....no amenities at all. The picture below pretty much says it all.

Things are beginning to change. One of our team parents donated his time and his tractor to level off our range a few weeks ago, and yesterday three of us started laying out trap fields. We began by driving a stake to signify the center of the trap machine and then measured 48 feet (16 yards) back from the stake to locate the center of the forward edge of station 3. Station 2 was located by using two intersecting lines - one line coming from the main stake and extending 48 feet towards the shooting line, and the other line coming from station 3 and extending 9 feet to the left. The other 16 yard stations were located using the same method, all keyed off of station 3.
The handicap stations were laid out by running a string line from the main stake to an additional stake driven about 30 yards uprange, touching the flags that were set to mark the 16 yard stations. A tape was then attached to the main stake and run to the secondary stake, again touching the 16 yard marking flag. More flags were set at 3 foot intervals moving uprange from the 16 yard marker.......rinse, lather, and repeat 4 times. At the end it looked like this:

field 1
Once the flags were all set we had to shoot a round on the new field....just to see how it worked, of course. I'm happy to say that I broke the very first target thrown from our soon-to-be Field #1.
We also took the opportunity to flag the stations for a second field in an as yet uncleared area to the left of Field 1. Field 2 is level, but needs to be cleared of some brush before we can proceed.

field 2
Next step: concrete forms. Stay tuned!
_
Sunday, July 02, 2006
First try.....shotmaking
I'm short on time right now, but I'll be back later to edit this post and fill in more details.
tick tock, tick tock
Ok.....as with any bullet casting, the first step is to clean the lead. Actually, I take that back.....the first step is to sort the good lead from the junk. We're using wheelweights collected from local tire shops as our lead source. The used weights come to us in 5 gallon buckets, mixed with old lugnuts, used rubber valve stems, broken sockets, and a myriad of other metallic junk, including stick on wheel weights that contain selenium and cannot be used for casting.
After sorting the good wheelweights from the junk, the weights go into the melting pot.

Our melting pot is an old cast iron dutch oven mounted on a steel tripod with a large single propane burner underneath. This arrangement is rock solid even with over 100 pounds of lead in the dutch oven. It takes about half an hour to melt that much lead, but large batches will help keep our final product more consistent.
A couple of quick notes about safety: in the picture above, there is a bare hand adding lead to the pot. Before you start sending nasty grams, please also note that the stuff in the pot isn't liquid yet. As soon as the lead actually started to melt, we put on our safety gear: welding gauntlets, leather welding jackets, eye protection, and hats to prevent sweat from dripping into the pot. Some folks will also notice that the melting pot appears to be inside a building. It is. What doesn't show in the picture is the 5000 cfm evaporative cooler that is blowing behind us and sending all the fumes out the open door. We may look stupid, but we try real hard not to act that way.
This is the way we were dressed for the rest of the day:
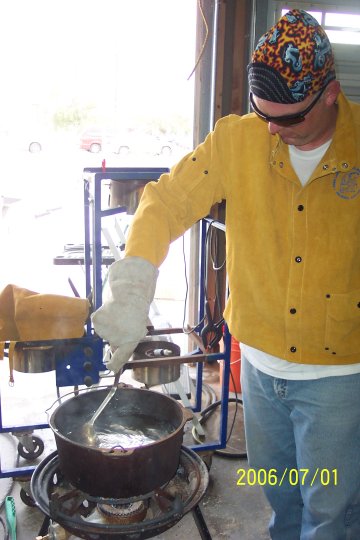
The tripod is set so that the work is done just below waist level. Using long handled utensils (think barbeque tools), the operator doesn't have to stoop over and has a perfect view of the metal without having to ever place his face over the pot. The blue rack in the background of the picture above is similar to the one we're building for the shotmaker. This one happens to be for home brewing beer........30 gallons at a time. Another hobby for another time.
We cleaned and drossed the lead using the beeswax method. I've heard of using sawdust, but I've never tried it.

final dross
The shotmaker has a much smaller melting pan than our dutch oven, so we needed an intermediate step for the lead. This was accomplished by casting 2 pound lead muffins in old cupcake pans. A single batch of wheelweights in the dutch oven yeilded 60 of the 2 pound muffins. I didn't think to get a picture of the muffins, but hopefully your imagination is good enough for you to visualize what a lead cupcake would look like.
Here's a picture of our trial setup:

The shotmaker is on a table, the ammo can is full of Sierra antifreeze, and the bus tub is there to catch the overflow from the ammo can as the shot displaces the liquid. The ingots in the pan are some left over lead cast in a Lyman ingot mold. The operational theory of this setup is:
- the shotmaker is turned on
- the lead melts in the pan
- one operator carefully lifts the shotmaker up while a second operator removes the boards underneath
- the shotmaker is placed level on the table
- the molten lead flows down the sloped melting pan, out the drippers, rolls down the small ramp (hard to see in the picture), and is quenched in the antifreeze
That's how it's supposed to work.
Our first problem was encountered when we switched the unit on. Nothing happened. After verifying that we did indeed have power to the unit, a voltmeter was fetched and we took our new toy apart. A few minutes of poking around revealed a bad fuse holder - power went in but didn't come out. Greg reached into his grab bag for the necessary parts and had the unit rewired and powered up in less than 5 minutes. Not a big deal, but it is rather disappointing to have a $300 piece of equipment sidelined by a 50 cent fuse holder.
Our second and third issues showed up when we started actually producing shot: 3 of the drippers were leaking and one was puddling on the ramp. The leaking drippers were fixed by tightening them with the unit hot (they were installed cold). We were called to dinner before we could find a solution for the puddling dripper, so that is first on our agenda for our next session. The puddling dripper is what produced the large blobs in the picture below. 
Even with the blobs from the wayward dripper, the first batch came out pretty well. The shot averages .095" (# 7 1/2) which is slightly larger than the .090" (# 8) that we wanted, but that is probably due to excess head pressure at the drippers since we had the pan full. As I recall, the melted lead is supposed to just touch the top of the drippers.....we were way past that. Our final production rack design includes a sorting station that consists of stacked seives to separate the shot into 4 groups:
- larger than # 7 1/2 -- remelt and recast
- # 7 1/2 -- my handicap loads
- #8 -- all other loads
- smaller than #8 -- remelt and recast
That's the true joy of casting your own projectiles....all your screwups can go back into the pot to be used again.
I haven't loaded any of the shot yet, but as soon as I do I'll post the pattern results.
_
![]()